
Self-Updating Applications
Introduction
Usually an application goes through multiple refinements and functionally updates during its life cycle. It is useful to have the applications self-update when a new version is released. This article discusses one such technique to enable self-update in a single-file console application.
Self-update demo
Click this to download the source skeleton implementing the self-update functionality. The zip file contains the TestApp console project. Unzip and launch the project in VisualStudio, switch it to release mode, compile and run. It checks for the new update and updates itself to a newer build. The update process looks something like this:
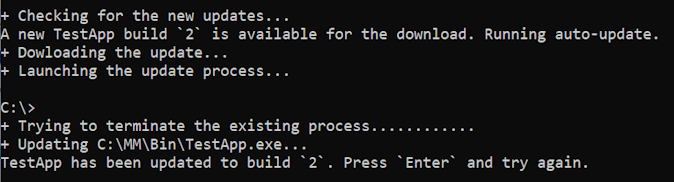
From the next run onwards, it should continue as usual after the update check. The updates are checked at an interval of 60 minutes to avoid unnecessary launch delays.

The update mechanism
Central to the update mechanism is a publish registry where information like the published build number and the download link are stored. When launched, the application reads the build number from the registry and compares it with its own build number. It downloads the application Exe from the download link to a temporary folder if a new newer build is found. The download is a self-contained, single Exe file. It then launches the downloaded application in update mode and terminates itself to free up the write lock on the current exe file. The target exe path, and parent process etc. are passed as command parameters to the updater app (it is the same exe running in a special mode). The updater copies itself to the given path and terminates to complete the update process.
Publishing a new build
Prerequisites
Following one-time preparation is needed before the first publish.
-
Obtain a publish registry credential from here.
TestApp.exe -publish
A TestApp developer publishes a new build after a significant functionality update/bug fix. Like the self-update, TestApp can also publish itself when launched with -publish command argument.

It expects following additional, positional parameters and needs a publish registry credential to complete the publish.
CSProjPath: The first publish parameter, defines path of the TestApp project file (.csproj). TestApp uses it to compile a self-contained, single Exe file. The publish settings are configured via a publish-profile, stored in the same csproj file.
PublishDir: The Exe is then copied to a local folder provided as the second publish parameter. This a local OneDrive[1] folder mapped to the download location. Note: Make sure the OneDrive Sync service is running in the background otherwise the download location mentioned next, will point to an incorrect TestApp version. Alternately, you can also publish it to any other local folder and upload the published Exe manually via web interface.
DownloadUrl: The third and the final parameter is the download URL from where the Exe can be streamed. This can be a read-only, public share created from the OneDrive[1] folder mentioned above. (See Creating a OneDrive download URL section below.)
Running TestApp.exe -publish with these parameters from the TestApp build directory (TestApp\Bin) prompts for publish registry Sign-in after the confirmation.

Use the existing publish credential or create a new on using this Register link. Application is published on successful sign-in.
Note: The user-name is the registration email address.

Or an error message is displayed and sign-in is prompted again. Press Ctl+C to cancel the publish.
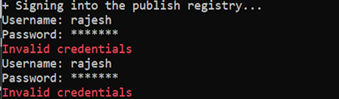
The publish details and sign-in credentials are stored securely and are used in the subsequent publishes. So next publish command would just be TestApp.exe -publish from the TestApp\Bin.
Plugging the update mechanism
The update mechanism is reasonably modular and can be easily plugged into relatively smaller console tools. To plug:
-
Copy the AutoUpdate.cs and the Res folder to the project’s root directory.
-
Change file Res\K.dat build action to Embedded resource.
-
Update the App.Name constant and the project namespace.
-
Place AutoUpdate.Run () call near the application entry point.
-
Add a single-file publish profile called FolderProfile to the project.
Creating a OneDrive download URL
The steps mentioned here assumes a local OneDrive setup. It should be easy to adapt them to browser based online interface.
-
Create a local OneDrive folder on your computer and copy TestApp.exe to this folder (it can be same exe compiled to TestApp\Bin folder on a developer computer).
-
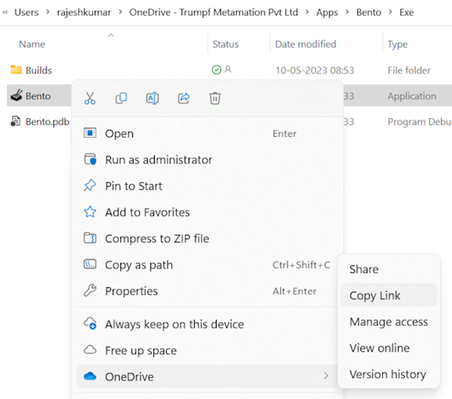
Now right-click TestApp.exe and select OneDrive > Copy Link menu to create a public link.
-
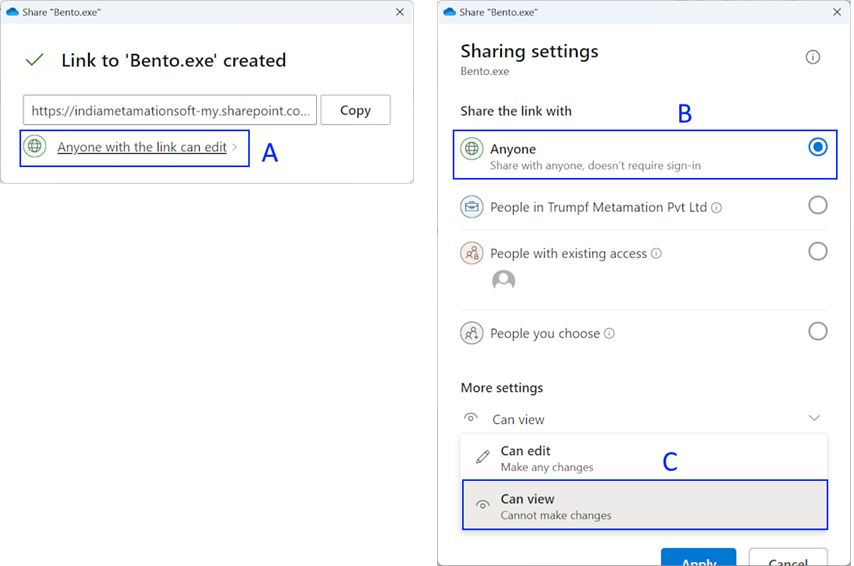
It should launch the Share dialog. We first need to change the link access from edit to view. To change:
-
Click Anyone with the link can edit link.
-
Now in the second dialog select Anyone radio if not already selected.
-
Change Can edit to Can view and press the Apply button. This would bring back to the first dialog. Use the Copy button to copy the share link.
-
-
The copied link would be in the format https://indiametamationsoft-my.sharepoint.com/:u:/g/personal/rajesh_metamation_com/EXKAkf99ld1KlJz_XAfs6hsBj0U0raViIZnZjUVVD-Y_dA?e=uXN86k. This is a browser link and cannot be used as direct download link. Remove the suffix after ? highlighted in the bold and append ?download=1 to change it to a direct download link. So the above link would change to: https://indiametamationsoft-my.sharepoint.com/:u:/g/personal/rajesh_metamation_com/EXKAkf99ld1KlJz_XAfs6hsBj0U0raViIZnZjUVVD-Y_dA?download=1
Copying this to a browser would immediately start the download as shown in the image below.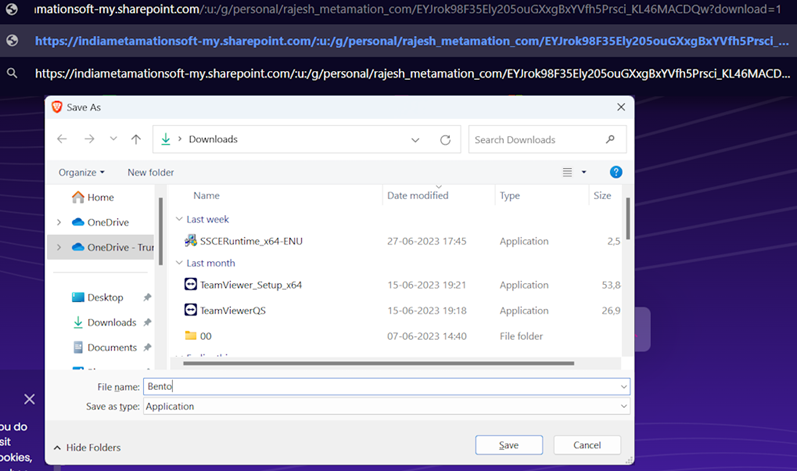
Use this link as the DownloadUrl publish parameter.
Note: Do not delete the TestApp.exe file (it changes the URL), it would get revised by a new one during the TestApp publish.