
Shipping Flux
This document explains the process of Flux release.
Flux release schedule
-
Flux weekly builds should always be released on Tuesday
-
Flux milestone build should always be released on 7th of a month. If that falls on a weekend then it should be released on the next working day.
-
The next weekly build which has to be released after this milestone will be on next week’s Tuesday and not the immediate Tuesday after the milestone release.
i.e. For eg if a milestone build is released on Nov 7th Friday, next weekly build should be on Nov 18th Tuesday
Creating a FogBugz case
The Flux shipment is managed by the Flux release team on a monthly rotation. To identify the person currently responsible for shipping, create a FogBugz case with a title like Shipping Flux - Lete and assign it to the designated team member for that month. The case will remain assigned to them until the milestone release is complete, at which point it can be closed. Each time a build is shipped, the responsible person should update the case by adding a comment indicating the shipment, such as Shipped Flux 619 or Shipped Flux 616.2 "Janssen".
Merging pull requests
-
Only pull requests assigned to the
reviewerL3should be merged. -
Build and run all tests in main and note down the time taken for the tests.
-
Switch to the branch of the pull request – say Case.41908
-
Do a
git pull. This is to avoid any issues if the branch already exists locally. -
Do a
git merge main -
Build and run all tests
-
Now, note the time taken for tests in this branch and check with that of main.
If there is noticeable change then please check with the respective team about the pull request and then proceed to merge.
-
If all tests pass, push the merged changes to the remote case branch
-
Merge this branch into the main branch, using the
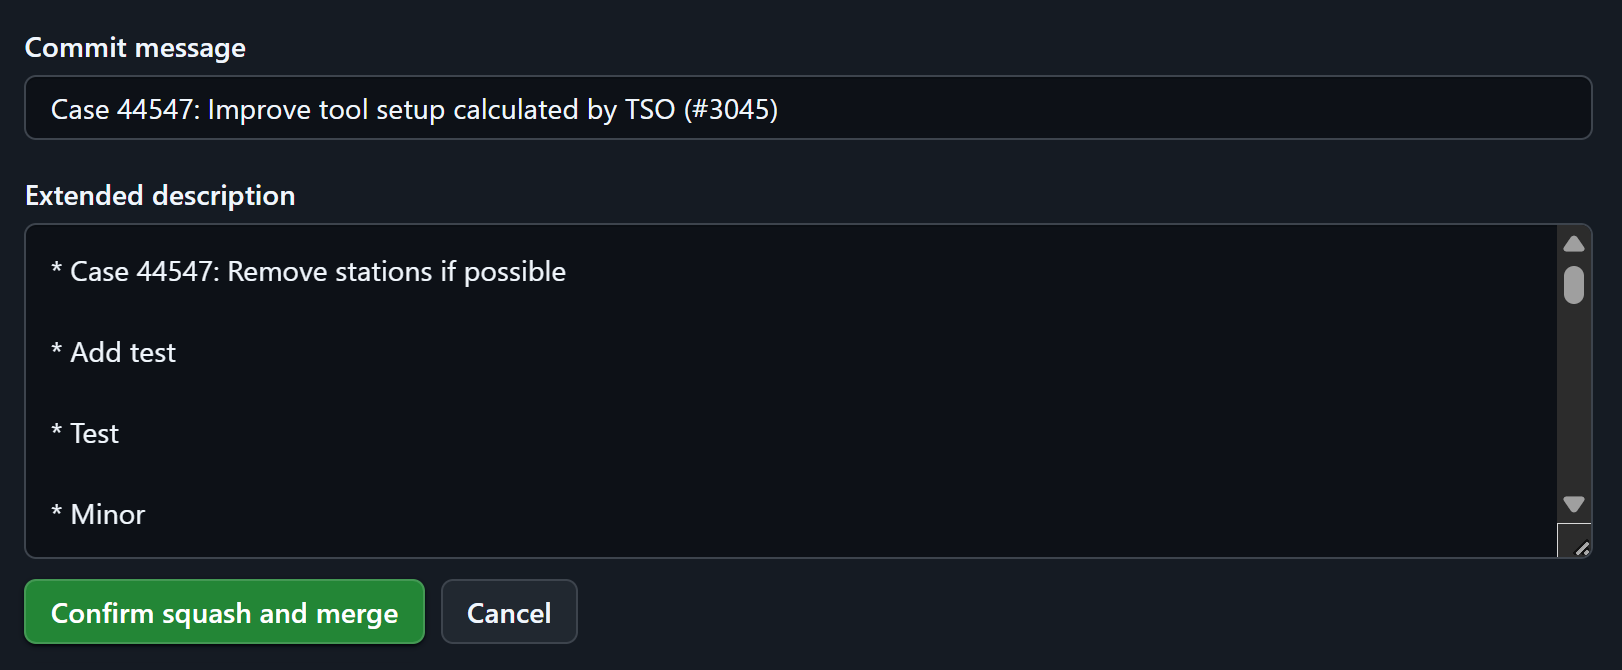
Squash and Mergeoption.Ensure that the commit message shown in the image below includes the case number in the required format so it can be linked to FogBugz. The extended description shows all commit messages from the branch. You can safely clear this section if the commit title already captures the purpose of the change. In many cases, commit messages are generic placeholders like “review fix” or “minor” which do not add meaningful context. Removing them helps keep the history clean and easy to follow.
-
Delete the branch after merge
-
Mark the respective FogBugz case as
ReadyToShipand set theFixedInfield with the Flux version being shipped. -
If there are merge conflicts:
-
Simple conflicts: Resolve and merge them yourself
-
Complex conflicts: If the tests fail due to a change in another branch, assign the issue to the respective developer to resolve or check and regenerate the tests.
-
-
Pull the merged changes into your local main branch
-
Build Flux in main branch
-
Once all pull requests are merged, build Flux in main branch and make sure all tests pass
Release notes
-
The release notes for the upcoming build can be found in Flux.Main.docx here
-
As and when you merge the pull requests, copy the release note for the respective case from Flux.Main.docx and append it to the file named Flux.xxx.docx (where xxx is the version to be shipped).
-
After all notes are appended, set the correct Flux version in Title, the Shipped date, and then refresh the Table of Contents at the top of the page. Remove the CONTENTS row displayed with a page number.
-
Use Save As to save the release notes as a pdf
Creating the installer and uploading Flux
-
Test the installer using the Sandbox tool. See the Testing with Windows Sandbox section for more details.
-
You can either:
-
Keep the installer output from the
TestSandboxrun, or -
Run
FShipto create the installer again.
-
-
If issues arise (e.g., missing Nuget packages), fix them in a new branch, merge to main, recheck the tests and create the installer again.
-
Upload the installer and the release notes PDF to the Trumpf sharepoint folder
NoteOnly the latest milestone, last weekly release installers and release notes should be kept. Move the older setups and release notes to the Older folder. -
Send an email about the release from the shared mail id Shipping.TINC@trumpf.com to the recipients in the Flux Shipping mailing list. When sending the email, set Shipping.TINC@trumpf.com as the recipient in the To field and add the Flux Shipping contact group to the BCC field.
-
Attach the release notes PDF.
-
Set the mail label as Business Confidential before sending the email.
NoteAll access requests for the Trumpf sharepoint folder received in Shipping.TINC@trumpf.com, must be forwarded to Sanjiv and Lakshmipathy for approval. Any changes to the mailing list must be promptly communicated to all other release team members.
Testing with Windows Sandbox
The Sandbox tool is a utility tool that creates a Flux installer and tests it within a Windows Sandbox instance. It’s a C# script file (.csx) which can be executed using the dotnet-script tool.
-
Install the dotnet-script tool by running the following command:
dotnet tool install -global dotnet-script -
Optionally, you may choose to register the
dotnet-scripttool to ensure your system is properly set up to handle C# scripts:dotnet script register -
Clone the UI test scripts and the TestFramework repositories into the same parent directory as the Flux repository. If you already have them, ensure you have the latest repository.
-
Run the Sandbox tool by passing your Work directory as an argument:
dotnet script X:\Tools\Tiny\TestSandbox.csx C:\WorkHere, C:\Work should contain the Flux, TestFramework and FluxTester repositories.
-
The tool will automatically build and run FShip. When prompted with Create Flux installer (Y/N):, enter Y. It will then create a Windows Sandbox instance and install Flux using the latest installer.
-
After the installation finishes, maximize the Sandbox window and then click runTests.bat on the Desktop. This will run all the necessary sanity tests to test Flux and then stop. Next, close the command window inside the sandbox instance and then close the Sandbox window. Finally, press any key in the command window (from where you ran
dotnet script) to stop the Sandbox instance.
|
Note
|
Closing the Windows Sandbox does not automatically stop the instance. The last step mentioned above is required to stop it. If not done, you will need to stop the Sandbox manually using the command wsb stop -- <sandbox instance ID>. The sandbox instance ID will be printed by the TestSandbox script before launching the Sandbox. |
Resolving cases in FogBugz
-
After the build is shipped, resolve the FogBugz cases corresponding to the pull requests that were merged.
-
Update the FogBugz case (Shipping Flux - Lete) created earlier with the respective comment indicating the build number.
Tag / Branch
Only for the named release a branch has to be created otherwise a tag has to be added to the main branch.
Creating a branch for the named release
-
Only for the named release (which occurs monthly), create a branch like 25.06.Isagel
-
Push the branch to the remote
-
Mark this branch as protected. All the branches that are created this year (with prefix 25) will be protected as the protection rule is already set. Branch protection can be set only by the repo admin, Sanjiv. So drop an email to him when the first branch is created at the start of a new calender year.
-
Create a new branch, bump the version (as shown below) and push the changes:
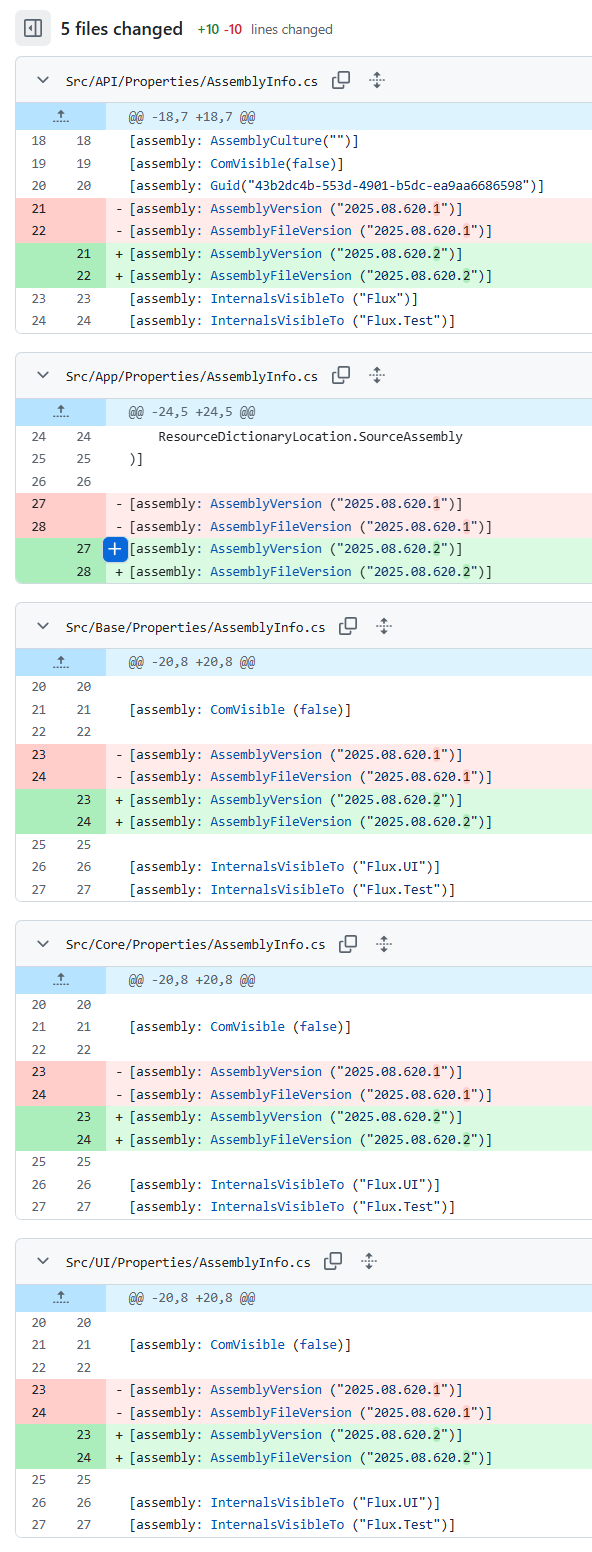
-
Create a PR and assign it to
reviewerL2. Note that when creating the pull request, the base branch must be correctly set as shown below.
-
Once it is assigned to
reviewerL3it can be merged into the branch.
Adding a Tag to the main branch for weekly release
-
Ensure you are on the main branch and then use the following command to add a tag for the shipping version:
git tag Flux.611 -
Push the tag to the remote:
git push --tags
Bumping the Flux version
After shipping a Flux build, the version number should be incremented. Create a new branch and follow the steps below based on the upcoming type of release.
-
For a weekly release: Only the main version number should be incremented as shown below:
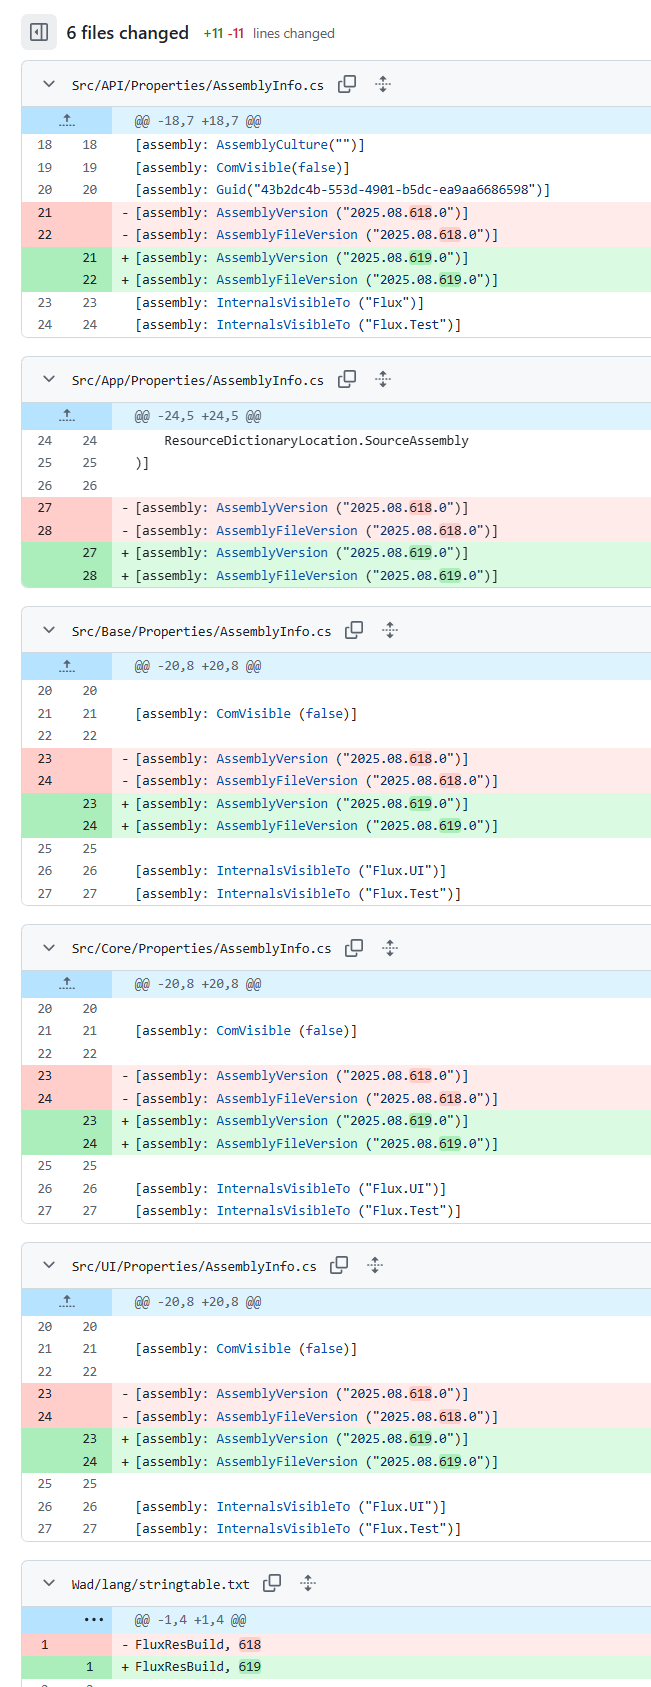
-
For a milestone release: In addition to incrementing the main version, the decimal part should also be bumped up. Add the milestone name to Builds.txt (located at X:\Tools\FShip) to ensure FShip includes the milestone name in the installer.
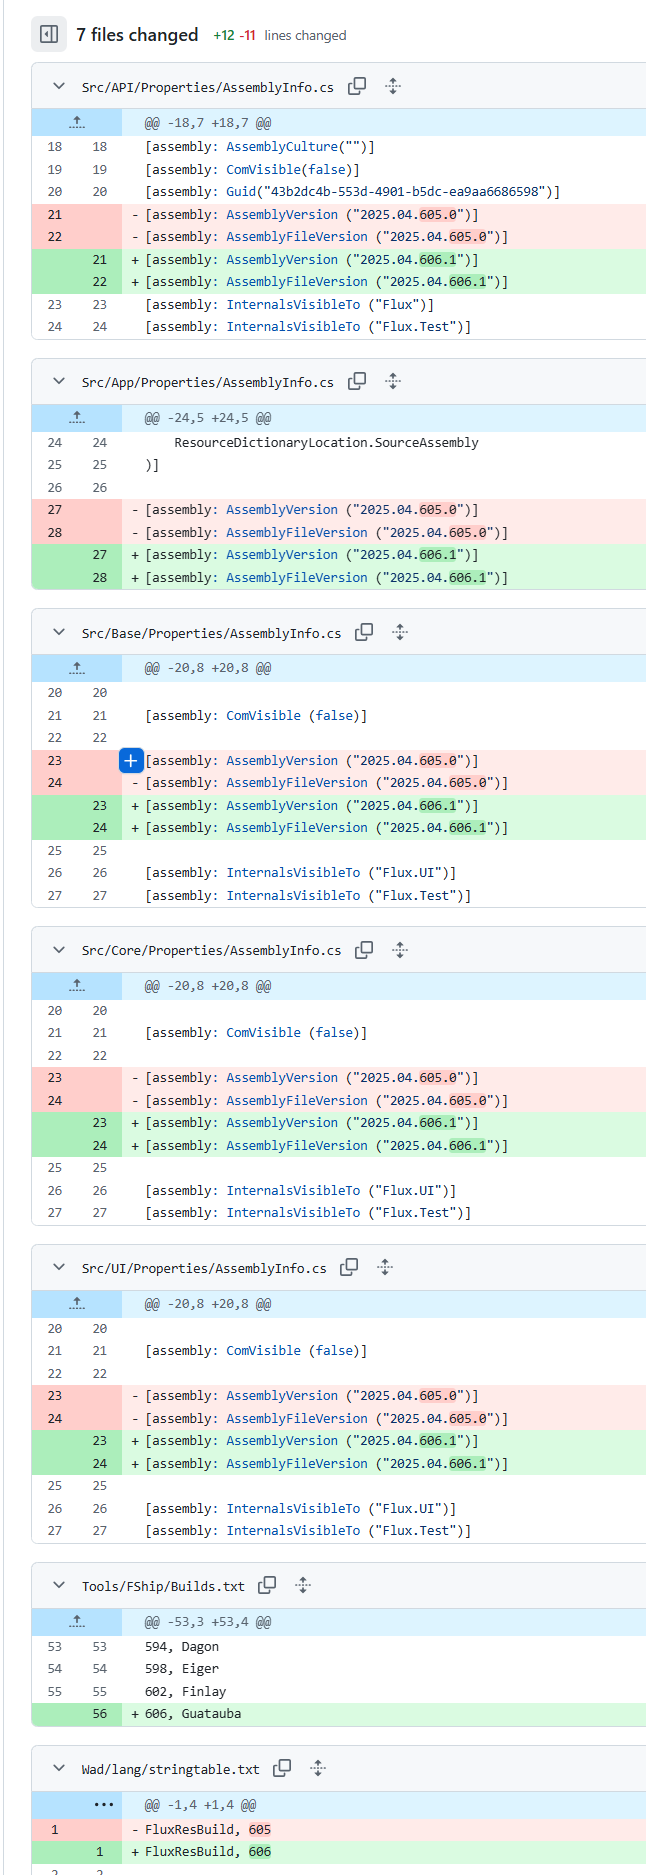
-
For a subsequent release after a milestone release: In addition to incrementing the main version, bump up the month and reset the decimal part to 0 as shown below.
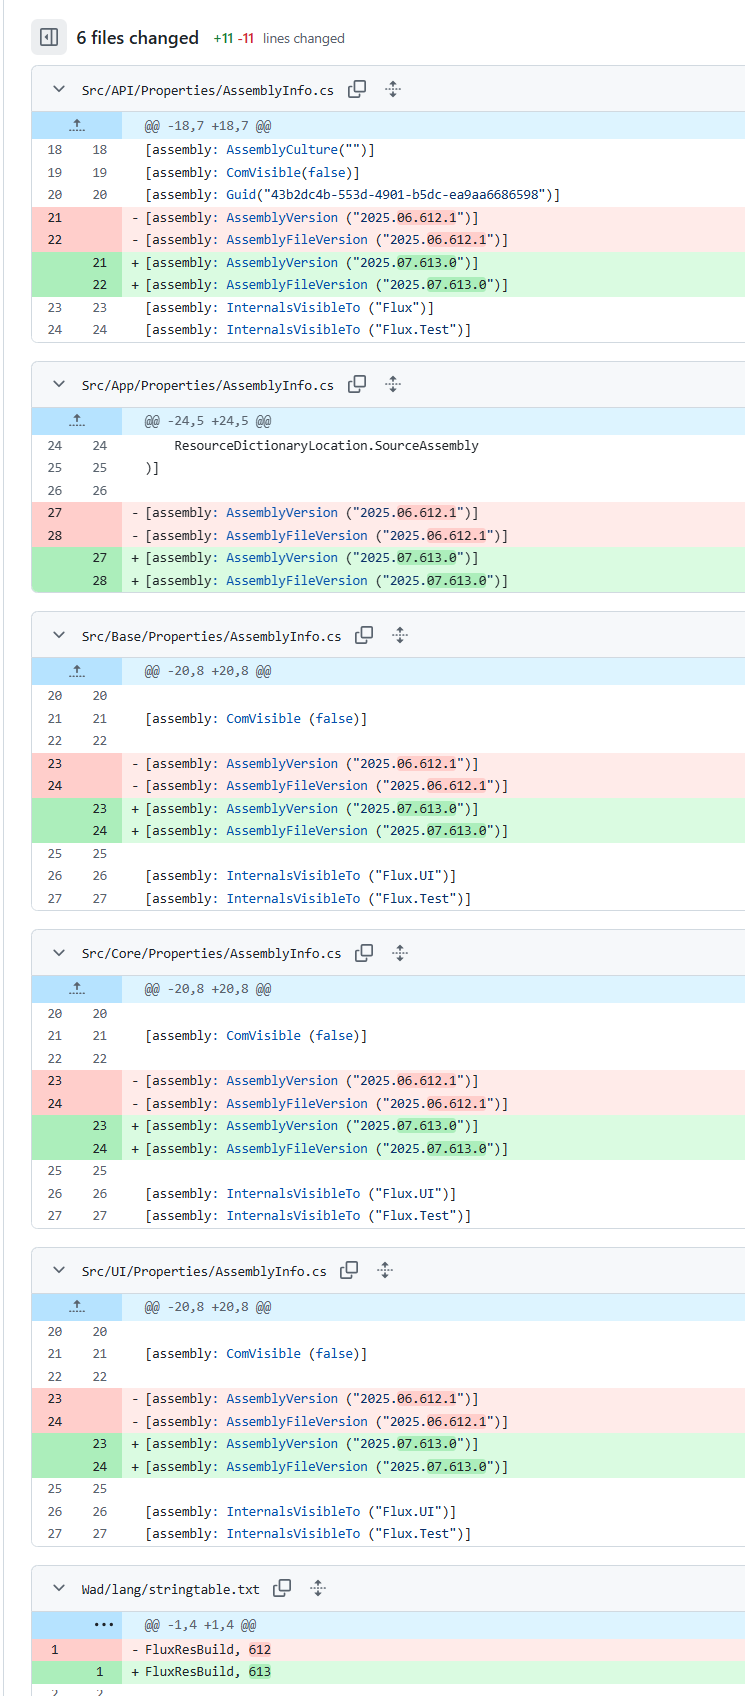
-
Push the changes to remote, create a PR and assign it to
reviewerL2. -
Once the changes are approved and assigned to
reviewerL3, merge the updates into the main branch.
Cherry-Picking
Occasionally, there are requests to apply fixes to older builds. In such cases, certain commits are cherry-picked and applied, then re-released as R2, R3, etc. The following process outlines how to cherry-pick a commit after merging a pull request into the main branch using Squash and Merge.
-
Ensure the commit is in the local main branch and all latest changes are fetched using
git pull. -
Switch to the target branch say,
git sw 25.06.Isagelwhere the commit needs to be applied. -
Apply the commit using the command:
git cherry-pick <commit-hash>Copy the hash from the commits page in the repository (as seen below). If the hash is long, it is often sufficient to use the first few characters, as long as they are unique.

-
Push the changes to remote. Follow the usual shipping process.
|
Note
|
The release notes should contain all the cherry picked fixes. So, move the fix from Flux.Main.docx to the appropriate document like Flux.612.3.docx (where .3 implies an R3 release). |
-
If the cherry-pick fails, it indicates a conflict with the target branch and the commit cannot be applied without resolving merge conflicts. In such cases, do not ship the build.