
Flux Workflow
This document explains how to set up a computer for Flux development. It also outlines the best development practices when working on issues in Flux. Following this workflow ensures a clean, efficient and collaborative development process. We assume that you are already familiar with the Git workflow and have already read the Git Configuration document.
Install a Recent version of Flux
There are multiple versions of C++ runtime libraries, .Net Frameworks and other dependencies needed to run Flux. The simplest way to get all these installed is to just install a recent version of Flux. You can download one from this link (pick the most recent version you can find there): https://1drv.ms/f/s!Akrv0aQW_YyviF59bk_EW6gFyYbm
Clone the Flux repository
Let’s assume you want to set this up at C:/Work/Flux. Use this command sequence:
md C:\Work
cd /d C:\Work
git clone https://github.com/Metamation/Flux
subst X: C:\Work\FluxNote: Add X:\Src\Bin to your path for convenience. The instructions below assume that you have done this
{{% notice info "Authenticating Git" %}} The first time you use Git to access a GitHub repo on this computer, you will get an authentication prompt asking you to select an authentication method. Use the Web browser method and follow the instructions to log into Github and authenticate this device. {{% /notice %}}
Add the pre-commit hook to your Git folder
We need a pre-commit hook to prevent accidental commits directly into the main branch. The hook executable is already part of the Flux repository, but you need to create the pre-commit file in the X:/.git/hooks folder with the following content (this is just a Bash script that runs the PreCommit.exe filter).
#!/bin/sh
exec Tools/bin/PreCommit.exe|
Note
|
This step is very important - don’t skip it! |
Build PreCommit
The source code for the PreCommit tool can be found in Tools/Git in the Flux source tree. Build this project found in X:\Tools\Git.
Testing the pre-commit Hook
It’s important to test that the pre-commit hook is set up correctly. Go to X:/, then switch to the main branch and try to commit (with no changes):
git switch main
git commit
If the hook is correctly installed, you should see:
**ABORT**: Do not commit to the main branch.
Unstage your work from main using 'git restore --staged',
Create a new branch using 'git switch --create NewBranchName',
and commit your work there.|
Warning
|
If you don’t see this error message you have not installed the pre-commit hook correctly. Do not proceed further, ask one of the Flux developers for help. |
First build of Flux, and running Flux.Test
Set up your environment variables:
-
Add
X:\Src\Binto the PATH (the instructions below assume this) -
Set the environment variable
set FLUXDEVELOPER=1
set FLUXDATA=X:\Data
set FLUXWAD=X:\Wad-
Add
C:\mm\binto the PATH -
Install Arial Unicode MS font
-
Build Flux.Log found in X:\Tools\Flux.Log
Then, use this command sequence:
dotnet nuget add source X:\Src\Lib
cd /d X:\Src
dotnet build
flux.test
The first line (which you have to do only once) adds the X:/Src/Lib path to the NuGet
search path (we store some private NuGet packages used by Flux there). The dotnet build
command builds all the DLLs and EXEs used by Flux (including the Flux tests). We run those
tests in the last line.
Note: Some image comparison tests may fail if using different graphic card. Get the Skip.txt from anyone in the Flux team and copy it in X:\TData. This will skip image failure tests.
Working on Flux cases
Here is the basic workflow you use to work on Flux cases. As you get more familiar with Git you can bend these rules if you know what you are doing.
-
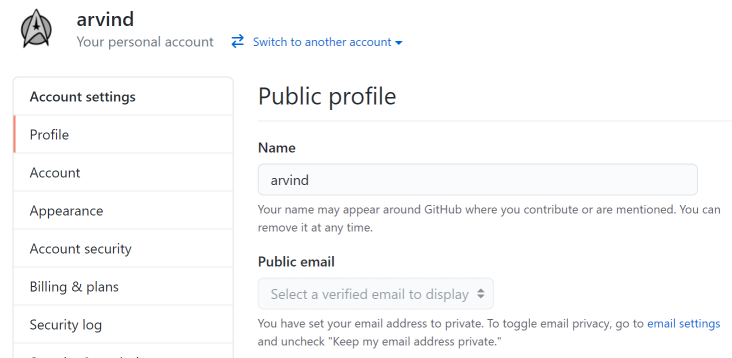
Update GitHub Profile Name: Set your GitHub profile name to lowercase. You can find this option in GitHub account settings > Profile. Use only your first name unless there is a conflict with another user.
-
Create a New Branch for Every Case: In general, we are going to use a branch for each case and these branches will be merged into main periodically (typically daily). There are no per-developer branches. New case branches are always created starting from main. There are no commits to the main branch directly - that grows only by merging in development from other branches.
First, create a new branch to work on. Make sure to base that branch on the current version of main like this:
git switch main                        <- switch to main first
git pull                               <- pull the latest changes, this will never cause a conflict
git switch --create Case.12345         <- create a new branch that forks from main
Note that the
git pullwill never cause a conflict since you will have no local changes on the main branch. Now, work as normal and periodically stage and commit your changes into the branch you created. Before committing, ensure you are commit-ready. Once you are done, push the branch to the Github server (which is called origin). The first time you do this, you need to create a corresponding upstream branch on the server that mirrors the local Case.12345 branch you created. So you need to do this (if you forget this, git push will helpfully remind you)git push --set-upstream origin Case.12345Subsequently, you can just do a git push. Eventually, you may have a few commits on this branch and you are then done. Go to github.com and create a pull request for this branch. This signals the person who merges pull requests that there are changes ready to be merged into main.
NoteAvoid reusing branch names. After the pull request is merged into main, the case branch will be deleted. If you are working on additional fixes for the same case, append a version number to the branch name (e.g., Case.12345.1) -
Creating a Pull Request (PR): Once a PR is created in GitHub, it has to be assigned to a fellow developer for review. Upon approval, it will be assigned to the lead for merging. Some of the key considerations when creating a PR are listed below.
-
PR Title: Title the pull request like "Case 37463: Add license check for API".
-
There should be a space between Case and the number. Then, the commit will get automatically linked to the case in FogBugz (because of the GitHub - FogBugz integration filter installed).
-
Use a colon after that. Then a space, then the case title in a more meaningful manner (note the captial letter for Add). The PR title should always be set correctly. Otherwise, when performing a Squash and Merge (which combines multiple commits that are part of pull request into a single one), the summary in the log is lost.

-
-
PR Notes: To ease reviews, write a brief note explaining the fix, so the code reviewer has some context on the problem. For an excellent example of this, see notes for #1189
-
Draft PR: If your work is still in progress, create a Draft PR and assign it to yourself. Once completed, it can be moved up for review.
-
Review Assignment: Before assigning code for review, ensure all checks have been completed, such as verifying formatting, removing commented lines of code, and eliminating unwanted space changes. Once the PR is ready for review, just assign it to the reviewer without explicitly raising a request for review in GitHub.
NoteAvoid making commits after putting up for review. If further changes are required, unassign it, make the necessary adjustments, commit and then reassign for review.
-
-
FogBugz Case Status: After assigning the PR for review, mark the relevant FogBugz case as For Review and assign it to the reviewer. Ensure that all necessary test data are attached to the case so the reviewer can validate the fix.
NoteTMM does not have access to JIRA, so all the relevant attachments must be added manually to the case. -
Release Notes: After submitting the pull request, release notes must be added. Please refer to the guidelines in Release Notes for Flux.
-
Addressing Review Feedback: If changes are required during the review process, the reviewer will reassign the PR and the FogBugz case back to the author for updates. In this case, make the necessary changes and commit them with a "Review Fix" message. If you haven’t already merged the latest changes from the main branch please do so. Ensure that all requested changes are made in the same branch. Once completed, reassign both the PR and the FogBugz case back to the reviewer. Do not create a new branch.
Meanwhile, you can start working on another case by creating a new branch and starting afresh. Remember to do the sequence with git switch main etc again.
WarningDon’t fork the new branch from your already existing Case.12345 branch!
Switching between cases
Now with Git you have the flexibility to switch to some other case and work there without having to complete your work on the first case. Suppose you also want start working on Case.67890 without necessarily completing the first case. Commit your changes to Case.12345 to your local branch and make sure you have a clean working directory. Now, create a new branch (remembering to switch to main first) and work there. You can now commit changes to that branch, switch back to the previous one and work on both of them in parallel.
Finally, when one of them is done, you can raise a pull request for this. This also gives the flexibility to merge Case.67890 or Case.12345 in any order without necessarily having to merge the other one. The pull request in Github is structured like a discussion. If the lead is happy with some changes, they can use the pull request to make some notes. You adjust the code further based on these notes, commit and push again. This throws the pull request back to the reviewer and your code will get reviewed again. After some back and forth, the branch is judged good to go and is merged. After this, we typically delete the branch (like Case.12345) since it has served its purpose.
-
Stashing your changes: When you are working on a feature or fix and need to quickly switch to another branch without committing incomplete or experimental changes, use
git stashto save your progress. This Git command allows you to temporarily store uncommitted changes in your working directory so you can switch tasks and return to your work by applying the stashed changes. For more details on how to usegit stash, refer to the Git documentation.
Pull periodically from main
Each time you start work on a new case, you are always starting with the latest main, thanks to
the git switch main / git pull that you do before creating a new branch. However, if work on a
case takes a while, it might be useful for you to periodically merge the latest changes from
main into your branch. Let’s say you are working on Case.12345. You will then do:
git add Changed.cs                                  <- assume we are now on Case.12345 branch
git commit -m "Case 12345: Add local rendering"     <- commit all changes here
git switch main                                     <- switch to the main branch
git pull                                            <- get the latest version of it
git switch Case.12345                               <- switch back to your work branch
git merge main                                      <- merge the changes in main
Note that this merge may cause a conflict if somebody else has edited the same area of the same file. You have to resolve this conflict.
Handling merge conflicts
Occasionally you will get merge conflicts (though less often than you would with Mercurial). Let’s take a simple example. Suppose we started with a text file like this:

Next, developer A, working on some branch changed this as follows (the changes are highlighted in yellow):

Meanwhile, developer B, working on some other branch changed this same file as follows:

Now suppose developer A pushes their change and files a pull request. I will merge this into the main branch and at this time, there will be no conflicts - the merge result will be a fast-forward merge (see the Git documentation to understand this).
Later, developer B, wanting to continue working on the code, tries to pull the changes from main (what we used to call a refresh in Mercurial), like this:
git switch main
git pull                       <- get the latest changes on main
git switch BranchB
git merge main                 <- and try to merge them in
You will get a result from git that looks like this:
Auto-merging greeting.txt
CONFLICT (content): Merge conflict in greeting.txt
Automatic merge failed; fix conflicts and then commit the result.
At this point, you have two options:
-
You can resolve the conflict using the external merge tool by using git mergetool. This brings up the conflicts in P4Merge and you can resolve them there.
-
You can just use a text editor to resolve the merge. Each area of conflict will have conflict markers around it. In this case, the file is so small that every line of it was involved in the conflict so the markers appear like this if you edit greeting.txt:
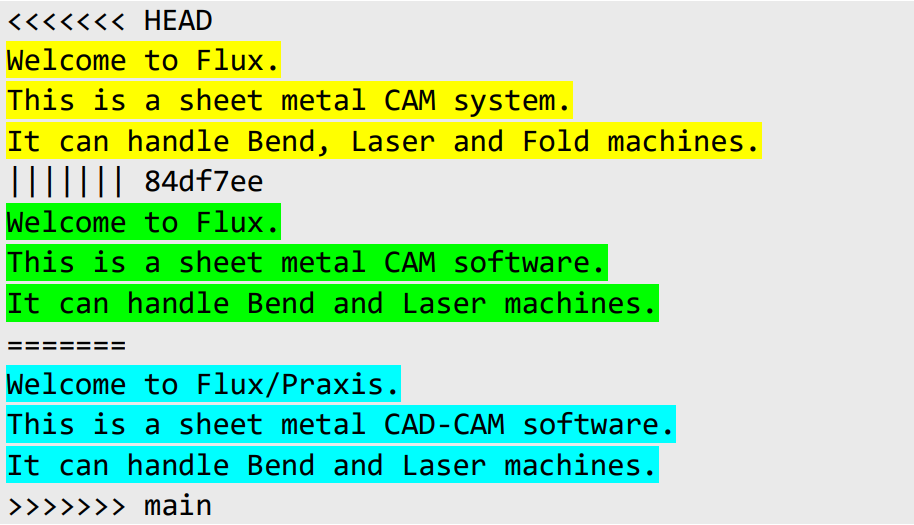
Note that there are actually 3 versions of the text shown in the file. The part in green
(in the middle) is the original version from before the branches diverged. The part in yellow
is the local version of the file that was just edited (this is called ours by Git). And the part
in cyan is the remote version of the file that the other person has edited (Git calls
this theirs). Note that the part in green (the original file) is included here only if you had
set up conflictstyle = diff3 as explained in the section above on setting up the merge tool.
I find this green text (original) to be very useful when figuring out how to resolve the conflict,
so I strongly recommend you set up this conflictstyle.
Now you can easily clean up the conflict in the text editor since you have all 3 versions
available and you can pick the exact version you want to keep. Usually, this is the
easiest way, since we can just search for all occurrences of <<<<<< in the code
and quickly find all the merge conflicts.
If you edit the file manually, you will finally do this:
git add greeting.txt            <- mark the resolution
git commit                      <- and complete the merge
If you forget to resolve one of the conflicts, the pre-commit hook we have installed will
prevent the commit from happening. Edit the offending files again to remove all the conflict
markers and try the commit again. If this conflict resolution becomes really complex or you are
unsure of how to resolve some of the conflicts, you can just back out of the whole mess by
using git merge --abort, push the code as is and file a pull request. Then it becomes the
problem of the person who is merging, to merge the incoming changes into main when handling the pull request.
Tools > Tiny
You can find some useful tools in the X:\Tools\Tiny folder. Open the Developer Command Prompt for Visual Studio, and build the .cs file to get the executable in the same directory.
X:\Tools\Tiny> csc FXOpen.cs
X:\Tools\Tiny> FXOpen.exe C40122.fx
As you can see in the example shown, FXOpen can be used to open any FX file within the X:\TData folder without the need to specify the exact file path.
Automate
-
To streamline repetitive tasks, you can create batch files that automate commands you frequently use. A batch file is a simple text file with a .bat extension containing a series of commands that run sequentially when executed. For example, you can create a batch file to automate your test runs as shown below.
cd /d X:\Src\Bin
Flux.Console Optimize 1
Flux.Console ResetData
Flux.Test.exe
Flux.Console Optimize 0
cd\
-
When dealing with repetitive or large-scale changes across multiple files, it is best to automate it.For example, if you need to update the
Z Shiftvalues for some machine ranges or adjust the back gauge settings, it is far more efficient to automate it than doing it manually. You can write the necessary code in a temporary file in FConsole, and later move it to the ReFlux repository underY:\DeadCode\Bend. This ensures the code can be easily accessed if needed in the future, while minimizing the risk of human error.
Ready to commit?
Before committing your code, take a look at these guidelines below and make sure to follow them carefully.
-
Avoid Data Redundancy: Redundant data should never be included, as this leads to unnecessary bloat. A good example of this is the redirect.map. With thousands of machines and the list still growing, there is bound to be a lot of duplicated data across machine models. Flux uses a redirection mechanism to avoid this redundancy. It generates a redirection map - a list that associates each file with its unique counterpart.
...
120020/Model/BendGuard.mesh2|120000/Model/BendGuard.mesh2
120020/Model/BendGuard2.mesh2|120000/Model/BendGuard2.mesh2
120020/Model/BG1.geo2|120000/Model/BG1.geo2
120020/Model/BG1Y.geo2|120000/Model/BG1Y.geo2
120020/Model/BG1Z.geo2|120000/Model/BG1Z.geo2
...
This ensures that only one instance of the file is stored and helps keep the storage compact. When you encounter a similar scenario use a similar approach to avoid redundancy and keep the application streamlined.
-
Rebuild Metadata: Metadata must be rebuilt whenever there are changes to type definitions. See the Metadata section for more information.
-
Keep the API Up-to-date: When there is a change in a class or type, the API definition must also be updated accordingly. To do this, run the APIGen tool (in X:\Tools\APIGen). This will help keep the API classes in sync.
NoteDo not modify the .gen.cs files generated by APIGen or metadata.curl manually. -
XLate: Whenever a new text is added or modified, it should be updated in the appropriate string table file in the
X:\Wad\Langfolder. When updating translation strings, ensure proper grammar and punctuation. Avoid camel case (for example, ToBendLine should be To Bendline). -
Be cautious with
git clean: When using git clean, always perform a dry run (git clean -n -d) first to preview the files and directories that will be affected. Once you confirm, proceed with the actual clean:git clean -f -d -
Run Flux Tests For Every Change: Run all Flux tests, even for minor fixes, to ensure everything works correctly. Follow the guidelines listed in the Test Cases section
-
Use Clear, Descriptive Commit Messages: Use commit messages like "Case 30081: Pickup from TBC machine should not be editable" to make it easy to search for commits later. Ideally, the text message should be not more than about 80 characters, so abbreviate it if the case title is too long.
-
Avoid Force Pushing: Refrain from using
git push --forceunless absolutely necessary. Force pushing can rewrite history and cause issues with the repository.
Metadata
Metadata should be rebuilt whenever there is a change in type definition. To update, run Flux.Console RebuildMetadata. This will generate a new metadata file and prompt it for review. Changes to types will be marked with Review: True. Carefully review each change and validate it. Key considerations for validation include:
-
In Flux, fields intended to store the serializable internal state of an object are prefixed with m, while fields representing transient, cached state (which can be recomputed) are prefixed with an underscore (_). Name your field accordingly.
-
Each type has its own version number in the metadata.curl file. (It’s up to us to bump this up whenever we refresh the metadata for a type!). When serializing an object out, this current version number is also written out into the Au stream. This can then be inferred in
PostLoadas seen below:
[PostLoad]
   void PostLoad () {
      if (mClampPos != null && AuType.ObjVersion < 4 && BMachine != null) {
         float dx = BMachine.Clamp0XPos;
         for (int i = 0; i < mClampPos.Length; i++) mClampPos[i] += dx;
      }
}-
Update the Flux version number to the current one.
-
After all changes are validated, remove the
Review: Trueflag and rename the metadata.new file to metadata.curl.
|
Note
|
Only commit changes relevant to your fix and revert any unrelated changes. |
Test Cases
-
Use valid test case IDs: Ensure the test case ID is correct and hasn’t been previously used in another branch that has not yet been merged into the
mainbranch. -
Follow the test case naming convention: Use the format "C37239: Stop position in X direction is incorrect" instead of "Case 37239: Stop position…" even if latter variants exist in the repository.
-
Review existing test cases: Before creating a new test case examine similar test cases in the repository for reference and consistency.
-
Understand the test case code: Ensure you fully understand the test case logic and verify that every line of code is essential for the test to run properly.
-
Disable tests that affect parallel execution: If a test case interferes with others during parallel test execution, disable it to avoid conflicts.
-
Ensure test failure without the fix: Confirm that the test case fails if the fix is not applied.
-
SkipReason: If you are temporarily disabling a test, provide a clear reason in the SkipReason attribute. For example: SkipReason = "Broken with fix for Case 37551". Avoid using vague statements like "Turning off" or "Temporarily turning off"; instead, specify the valid reason for the action.
-
Handling Image Tests: There are several tests in Flux that are comparing images rendered using OpenGL. In addition to actual image comparison tests, tests that use the report writer also have this dependency. These tests fail sometimes, especially when there are new graphics cards, or new generations of existing graphics cards. There are two solutions to this.
-
Creating a result variant: Suppose a test is using an output file like C23806.html, and it fails on your computer. This typically means the generated result (TData/tmpfile.tmp) does not match the reference (C23806.html). You can create a new variant of the result, which is also acceptable by creating a file like C23806.(1).html in the same target folder. Flux.Test will check for variants like C23806.(1).html, C23806.(2).html etc.
Of course, first verify that the failing result tmpfile.tmp looks visually similar to C23806.html.
Removing variants: Sometimes, a change will be made that causes the original result C23806.html to change drastically. For example, suppose we change the rendering color for the punches. This will cause C23806.html to be regenerated. In this case, you should not just regenerate this test, but should also delete all the variants (since they are definitely no longer good).
-
Skipping the test: A simpler alternative (which is recommended) is to just skip the test on your computer. To do this, create a local skip file called C:/ProgramData/Metamation/Flux.Test/skip.txt. Each line in this file contains an integer test number. Those tests will be skipped on your computer. You should never have to do this for a non image-based test. If some such test fails on your computer, please report. Unless you are working on code that could potentially change the image rendering, skipping image tests should not be a big concern.
-